-
-
-
Tổng tiền thanh toán:
-
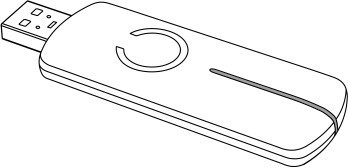
Name: Z-Stick Gen5
Model Number: ZW090
ZW090-A: US Frequency
ZW090-B: AU Frequency
ZW090-C: EU frequency
Product Weight: 19 g
Total Package Weight: 39 g
Product Dimensions: 88 x 28.5 x 10 mm
Package Dimensions: 50 x 122 x 15 mm
UPC/EAN:
US: 810667023034
EU: 1220000012813
AU: 1220000012806
Device Type: Z-Wave USB Controller
Z-Wave Plus Certified: Yes
Z-Stick Gen5 SDK and firmware:
Z-Stick Gen5
RPi4 compatible: Not without unpowered USB Adapter
Recommended USB Adapter with RPi4: Sabrent or Anker unpowered USB hub (2.0 or 3.0)
Firmware Version: V1.00 or V1.01
SmartStart: No
SDK Version: V6.51.02 or V6.51.10
New Z-Stick Gen5
RPi4 compatible: Yes, works without USB adapter.
Firmware Version: V1.01
SmartStart: No
SDK Version: V6.51.10
Power Supply:
USB DC 4.75V to 5.25V
Built-in rechargeable lithium battery 3.7V, 100mAh.
Max Standby Current: 30uA.
Max Operating Current: 98mA in PA mode or 40mA in normal mode.
Max Z-Wave Nodes: 232 devices
Sensitivity of the RF receiver:
9.6kbps @ -90 dBm
100kbps @ -90 dBm
Transmitting power:
Disabled PA @ 2.91 dBm
Operating Temperature: 0 C to 50 C.
Storage Temperature: -20 C to 70 C.
Operating Distance:
Up to 150m outdoors
Up to 400m outdoors with PA mode
Up to 75m indoors with PA
Z-Stick Gen5 user guide.
Aeotec Z-Stick Gen5 was developed to control actuators and sensors in a Z -Wave Plus (http://aeotec.com/z-wave-plus)
Network as a self-powered Z-Wave® USB Adapter. It is powered by Aeotec’s G technology.
en5 (http://aeotec.com/z-wave-gen5)
The t echnical specifications of Z-Stick Gen5 (https://aeotec.freshdesk.com/solution/articles/6000167094-z-stick-gen5- t echnical-specifications-) can be viewed at that link.
Get to Know Your Z-Stick.
Important safety information.
Please read this and other device guides carefully. Failure to follow the recommendations set forth by Aeotec Limited may be dangerous or cause a violation of the law. The manufacturer, importer, distributor, and/or reseller will not be held responsible for any loss or damage resulting from not following any instructions in this guide or in other materials.
Keep product and batteries away from open flames and extreme heat. Avoid direct sun light or heat exposure. Improper battery use may damage the product.
Z-Stick Gen5 is intended for indoor use in dry locations only. Do not use in damp, moist, and / or wet locations.
Quick start.
Z-Stick operates in three distinct modes: Inclusion-Mode, Removal- Mode and SerialAPI-Mode. Both Inclusion-Mode and Removal-Mode require Z-Stick to be unplugged from the USB connector of the host, while SerialAPI-Mode requires that Z- Stick to be plugged into the USB connector of the host. Software drivers for the “ZW050x_USB_VCP_ PC_Driver” may need to be installed in order for Z-Stick to be recognized on some computers.
To quickly get started, please follow our Z -Stick Gen5 Quick Start - Just the essentials article.
(https://aeotec.freshdesk.com/solution/articles/6000092802-z-stick-gen5-quick-start-just-the-essentials)
Recommended software to start with.
We recommend free software Domoticz if you are just getting started, you can view this guide here: Z -Stick Gen5 and h ow to ge t started with Domoticz. (https://aeotec.freshdesk.com/solution/articles/6000199837-quick-start-z-stick-gen5- w ith-domoticz)
Inclusion-Mode: Adding/Including Z-Wave Devices into the Z-Wave Network.
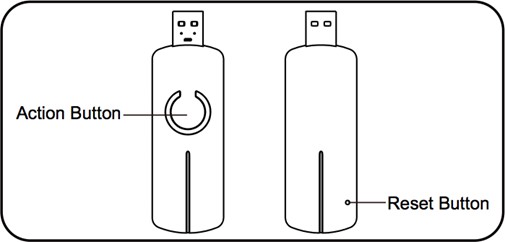
1. To initiate Inclusion-Mode, unplug Z-Stick from the USB connector and then tap the Action Button. (The blue LED will blink slowly.)
2. To include a new Z-Wave device into the network, simply go to the device with Z-Stick and press the button on the device you wish to include. (The blue LED on Z-Stick will blink fast during a network neighbour discovery and stay solid for 2 seconds to indicate successful inclusion of the device into the network.)
3. The blue LED will then return to blinking slowly, indicating readiness for further device inclusions. Repeat step 2 for each device you wish to include.
4. Tap Z-Stick’s Action Button to turn it off or it will automatically exit the removal mode after 30 seconds of inactivity.
Removal-Mode: Deleting/ Removing/Excluding Z-Wave Devices from the Z-Wave Network.
1. To initiate Removal-Mode, unplug Z-Stick from the USB connector. Then press and hold down the Action Button for approximately 2 seconds. (The orange LED will blink fast.)
2. To remove a Z-Wave device from the network, simply go to the device with Z-Stick and press the button on the device you wish to remove. (The blue LED on Z-Stick will immediately stay solid for 2 seconds to indicate successful removal from the network.)
3. The orange LED will then return to blink fast, indicating readiness for further device exclusions. Repeat step 2 for each device you wish to exclude.
4. Tap Z-Stick’s Action Button to turn it off or it will automatically exit the removal mode after 30 seconds of inactivity.
Third party Host Software.
In order to use the Z-Stick Gen5 and control your Z-Wave network, you must download a third party software to have full control over your software. You can find all known third party softwares in this link:
h ttps://aeotec.freshdesk.com/solution/articles/6000042049-host-software
(https://aeotec.freshdesk.com/solution/articles/6000042049-host-software)
We do not provide software apart from:
Backup Tool
Advanced use.
Backup Tool for Z-Stick Gen5
You are able to backup the Z-Stick Gen5 using our Z-Stick Gen5 Backup Software in any case you need to restore an older save of your network, or replace a failed Z-Stick Gen5. This way you will never have to re-do your network if there are catastrophic issues.
You can download the installation setup for Backup Software here:
h ttps://aeotec.freshdesk.com/solution/articles/6000108806-z-stick-gen5-backup-software
(https://aeotec.freshdesk.com/solution/articles/6000108806-z-stick-gen5-backup-software)
You can learn how to use Backup Software here to backup, and
restore: https://aeotec.freshdesk.com/solution/articles/6000167023-how-to-use-z-stick-gen5-backup-software-
b ackup-and-restore- (https://aeotec.freshdesk.com/solution/articles/6000167023-how-to-use-z-stick-gen5-backup-software- b ackup-and-restore-)
Installation and Maintenance Application (IMA) feature.
When Z-Stick is in Serial API- Mode and acts a primary controller, it can measure the network health for each device in the network. The different colour of LED indicates the communication quality between the Z-Stick Controller and devices in the network.
When Z-Stick acts an independent / secondary controller that has been un-plugged from the USB host, it also can measure the network health in Z-Wave network. The different colour of LED on Z-Stick indicates the communication quality between the Central Controller and the current location of Z-Stick in the network.
Short press the Action Button 5 times.
If the colour of the LED light changes to purple and is then followed by fast blinking that means it goes into the IMA feature. The colour of the LED indicator will be changed according to the network health level. A green LED light means that the current communication quality is more than 95% on -7dBm. An orange LED light means that the current communication quality is more than 95% on 0dBm. A purple LED light means that the current communication quality is less than 95% on 0dBm. A red LED light means that the current communication has failed.
Short press the Action Button 5 times again, Z-Stick will automatically exit the IMA feature.
SerialAPI-Mode: Allowing a Host Processor To Take Control of the Z-Stick and Take Part in the Z-Wave Network.
Note:
To initiate SerialAPI-Mode, plug Z-Stick into the USB connector of the host (i.e. PC, MAC, or Gateway).
1. While in SerialAPI-mode, Z-Stick is always listening (it is awake and always in RX receive mode) for instructions and acts as a Z-Wave adapter and responds to commands sent through USB by the host processor software.
2. Pressing the Action Button will not have any effect while in SerialAPI- Mode. But short pressing the Reset Button will reset the USB port.
Adding Z-Stick to a Pre-existing Z-Wave network.
This must be done through the host software which takes control of Z-Stick USB adapter while Z-Stick is in SerialAPI- Mode. Please consult the instruction manual of the host software to add the Z-Stick to a pre- existing Z-Wave network (i.e. “Learn”, “Sync”, “Add as Secondary Controller”, etc.). This function can only be performed via host software.
Reset your Z-Stick.
At some stage, you may wish to reset all of your Z-Stick’s settings to their factory defaults. To do this:
Press and hold the RESET Button for 20 seconds and then release it. (You can visually watch the 'C' LED) The LED will blink red faster and faster over the course of 20 seconds.
The blue LED will solid for 2 seconds as confirmation of a successful factory reset, you may now let go of the RESET button.
Z-Stick also can be reset to the factory defaults settings via the host software (host software can be any third party software such as: Homeseer, Domoticz, Indigo, Axial, etc).
The host software must take control of Z-Stick USB adapter while the Z-Stick is in SerialAPI-Mode.
Find the Reset Z-Wave controller option/button/function in your third party software.
Disable Z-Stick Gen5 LED using Backup Tool
You can disable the LED of the Z-Stick Gen5, there is only one requirement which is the use of a Windows OS to use Backup Tool.
Please follow the article here and follow through with the step by step instruction set to disable the LED of your Z-Stick Gen5:
h ttps://aeotec.freshdesk.com/solution/articles/6000171881-how-to-disable-led-on-z-stick-gen5-
(https://aeotec.freshdesk.com/solution/articles/6000171881-how-to-disable-led-on-z-stick-gen5-)
Add Home Assistant
This integration allows you to control a Z-Wave network via the Z-Wave JS driver. This is our recommended Z-Wave integration for Home Assistant.
Please review the limitations below before you get started as a few devices still may not work or only work partially.
Quick start (Home Assistant including Supervisor)
To add Z-Wave JS to your installation, plug the Z-Wave stick into the device that runs Home Assistant. Then Go to Configuration >> Integrations in the UI. Click the “Add integration” button in the bottom right and from the list of integrations, select “Z-Wave JS” and follow the instructions shown.
Note: A new network key is automatically generated for you. If this Z-Wave stick has already paired with secure devices, you need to enter the previously used network key. Make sure that you keep a backup of this key in a safe place in case you need to move your Z-Wave stick to another device.
If you do not run Home Assistant OS (the default installation type) or Home Assistant Supervised, please see the advanced installation instructions.
Using Z-Wave
When the Z-Wave integration starts up, it will interview your entire Z-Wave network. Depending on the number of devices paired with the Z-Wave stick, this can take a while. Information about your devices is stored in cache files by Z-Wave JS. Be aware that (re)starting the Z-Wave server will cause your network to be (partially) unresponsive until the interview process is done.
ImageImageNote
Advanced users: Make sure that the server started successfully by inspecting the logs. Give the Z-Wave controller some time to start.
While your Z-Wave mesh is permanently stored on your stick, the additional metadata is not. When you lose the cache files (for example by switching between any of the below-mentioned ways to run the server) all your nodes will have to be re-interviewed again before they can be properly controlled. You can speed up this process by manually waking up your battery-powered devices. Most of the time this is a press on the button on those devices (see their manual). It is not needed to exclude/re-include devices from the mesh. Just be patient and the devices will appear.

Giao hàng trên toàn quốc
Thành tiền:


